© COPYRIGHT NOTICE All Rights Reserved
Everybody, working with older type tubes knows the problem, the sockets can get loose. Fixing this is not easy, because glass is hard to glue as you may know. The high glass temperate will either make that any regular glue will soon break off again, or some glue types will crack the tube glass when the tube cools down.
The best way to attach the base, is original tube base glue. This is a mixture of pre-burned resin, grinded stone, and other ingredients. It must be solved in alcohol and then baked in an oven at 175 °C for 45 minutes. When done well, this will last a few decades, but after that get brittle and the socket gets loose. But... the disadvantage is, it cannot be used to repair historical tubes. The very old tubes may crack the glass when the tube is baked into an oven to cure the glue.
The problem: how do we repair those old tubes?
:( Two components glue. This will get loose soon, or worse it can cause a glass breakage after some months of storage. It causes a circular crack, and the whole glass bulb comes off.
:( 10-seconds glue. I call it Ebay glue. For absoltely sure, it will come off again later. After enough w arming up cycles it will not stick to the glass anymore. Also any drips along the tube base can't be removed. So you may end up with a smeared tube base, and still the base is loose after some time.
The Solution:
Use our repair glue.
First, here s is the composition of historical tube base glue: Stone powder, Orange Shellac particles, Resin, Aniline. Then, this powder is solved in Alcohol, and the glue compound must be used within 4 hours.
This glue has a similar expansion coefficient as glass, which is very important, or you would get glass cracks. Glass is curious material. When there is mechanical tension on it, for months or years nothing will happen. Then, suddenly it will crack, usually at pre-exposed places. Like when the glass is bended, or where the glass touches the tube base. Also the surface right behind a getter in the tube base, was exposed to large heat during getter flashing. If there is mechanical pressure on the base, a crack may develop behind the getter.
A general problem we all know, hot glass will crack when it touches a fluid like water or alcohol. This property, let's call it a problem too, will get very much worse, when glass gets older. Pre damage may remain unnoticed for years, and later crack. The original tube glue is applied as a wet compound. So during hardening in the oven, the alcohol will at first evaporate, and then the resin and shellac will burn, and form the final glue. During this process, the glue will boil, and in the beginning, the temperature of the glue cannot be higher as the boiling temperature of alcohol. Whereas oven temperature is higher. This temperature difference will pre-damage mainly OLD glass. Even new glass wants to be treated carefully, but old glass will damage for sure. Then after a few days, months or years, your repaired tube will crack. We had to learn it the hard way, this is definitely NOT working on older tubes.
Something similar occurs when you repair older tubes with two components epoxy. This will put mechanical force on the glass, which force is temperature dependant, and after months or years, the glass may crack. Also this seemed NOT a good idea.
So a repair glue must be applied cold, and have the same expansion coefficient as glass. We have developed a glue for this. It will repair the base permanently, without destroying the original glue compound inside the tube base. So the tube stays as original as can be, with no signs of the repair afterwards. There is no need to desolder the wiring. Though a re-solder afterwards is recommended, but only when you are sure you can nicely do this. If you need to learn this, practice it first on a tube that you want to dispose anyway.
The used glue mixture is a result of many trials. The tube glue we have now, is based on three solvents that are mixed. The base compound makes the glue look milky and reasonably water solvable, which is convenient when you work with it. Also the glue contains some stone powder and shellac, which helps to fill small gaps.
With this glue, you don't need to remove the socket. Any dirt between the base and the original old glue does not need to be removed. This glue will form a strong and flexible compound with any old residue. The Emission Labs ® repair glue contains a material, that soak inside the old glue compound and rejunivates it. Like this the old glue can stay in place, and the base does not have to be removed.
|
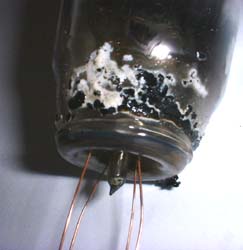
This picture shows how the Emission Labs ® repair glue forms a compound with the original glue. The original glue is the black particles that you see. They get weak again, and are soaked with the resin solution. NOTE, it is not normal to take off the socket; we just did so to look underneath, and see what happens. This is an old GECO rectifier tube, with almost no old glue left inside anymore. Only showed here to demonstrate how the old glue is weakened again. When using the glue, you should leave the socket on. |
© COPYRIGHT NOTICE All Rights Reserved